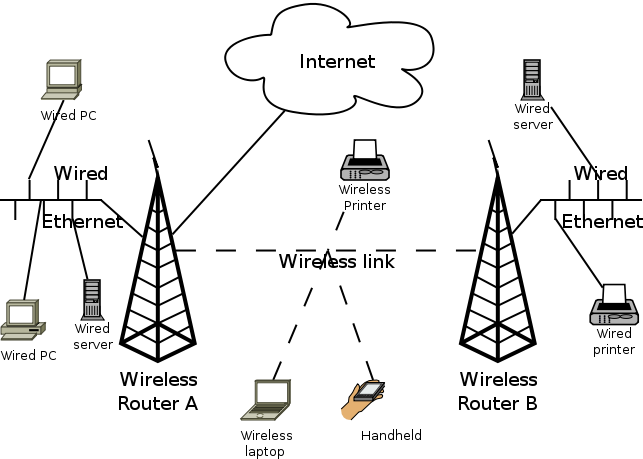
This article describes how I set up two wireless routers in my apartment, to provide a PSK2 encrypted wireless connection for all my household equipment. The primary router is connected to the Internet, and one repeater router is used to get better wireless coverage. The routers are linked together wirelessly using WDS (also PSK2).
For software, I’m using OpenWRT. For hardware, I’m using two broadcom-based Asus WL-500G Premium boxes, but any router supported by OpenWRT should work.
If you need a 3G connection as well, you may find my wireless router with 3G USB dongle or my summer house wireless+3g network writeup more relevant.
If you want to comment on this, please go to the blog entry.
Created by Simon Josefsson on 2008-05-08 for OpenWRT 7.09, updated for OpenWRT 8.09 on 2009-03-23, for OpenWRT 8.09.1 on 2009-06-09, for OpenWRT 8.09.2 on 2010-02-03, and for OpenWRT 10.03 on 2010-05-03.
Chosing OpenWRT Image
You may build your own OpenWRT image, or you may download a pre-made one from openwrt.org.
For the ASUS WL-500gP device I chose the brcm-2.4 variant of OpenWRT for this device. The plain brcm variant will work, and it uses the newer 2.6 kernel, but wireless will not work.
Downloading Image
To avoid building the image yourself, you may download it from openwrt.org.
$ wget --quiet http://downloads.openwrt.org/backfire/10.03/brcm-2.4/openwrt-brcm-2.4-squashfs.trx
$ sha1sum openwrt-brcm-2.4-squashfs.trx
8ce8e5edeff3dc95ae9da2e54ac5b2dde991a733  openwrt-brcm-2.4-squashfs.trx
$
Building OpenWRT
You may skip this section if you do not want to build your own image.
Building OpenWRT is quite easy these days. I’m using Debian x86 lenny, and you will need to install gcc and other development tools. Here are the commands I used:
svn co https://svn.openwrt.org/openwrt/trunk/
mv trunk openwrt
cd openwrt
make menuconfig
#  toggle 'select all packages by default'
#  quit and save config
make
That’s it! The complete build takes up about 2GB on my machine, and it will take quite some time to build (up to several hours).
The output files will be stored into the bin/ directory.
Installing OpenWRT
There are generic Installation instructions on the the OpenWRT Wiki.
You’ll have to use a ethernet cable at this point. Connect it to LAN1-LAN4, not WAN. Configure your local machine on the 192.168.1.x network, for example as 192.168.1.42. The router will use 192.168.1.1.
On many routers, including the Asus WL-500g Premium that I use, you flash an image by disconnecting power, press and hold down the reset button, and connect the power again. Wait a few seconds and the PWR led will start to blink. Release the reset button. The device will now have a tftp server running on 192.168.1.1.
$ tftp 192.168.1.1
tftp> trace
Packet tracing on.
tftp> binary
tftp> put openwrt-brcm-2.4-squashfs.trx
sent WRQ <file=openwrt-brcm-2.4-squashfs.trx, mode=octet>
received ACK <block=0>
sent DATA <block=1, 512 bytes>
received ACK <block=1>
sent DATA <block=2, 512 bytes>
received ACK <block=2>
sent DATA <block=3, 512 bytes>
received ACK <block=3>
sent DATA <block=4, 512 bytes>
...
received ACK <block=4742>
sent DATA <block=4743, 512 bytes>
received ACK <block=4743>
sent DATA <block=4744, 512 bytes>
received ACK <block=4744>
sent DATA <block=4745, 0 bytes>
received ACK <block=4745>
Sent 2428928 bytes in 6.2 seconds
tftp> quit
$
Wait one minute and restart the box by disconnecting and reconnecting power. Some documentations claim that the device should restart by itself but I have never seen this happen, no matter how long I wait.
Configuring OpenWRT
When the router has restarted, it will have a telnet server running listening on 192.168.1.1.
$ telnet 192.168.1.1
Trying 192.168.1.1...
Automatic decryption of input is enabled
Automatic encryption of output is enabled
Will send login name and/or authentication information.
Connected to 192.168.1.1.
Escape character is '^]'.
 === IMPORTANT ============================
  Use 'passwd' to set your login password
  this will disable telnet and enable SSH
 ------------------------------------------


BusyBox v1.15.3 (2010-04-06 04:14:37 CEST) built-in shell (ash)
Enter 'help' for a list of built-in commands.

  _______                     ________        __
 |       |.-----.-----.-----.|  |  |  |.----.|  |_
 |   -   ||  _  |  -__|     ||  |  |  ||   _||   _|
 |_______||   __|_____|__|__||________||__|  |____|
          |__| W I R E L E S S   F R E E D O M
 Backfire (10.03, r20728) --------------------------
  * 1/3 shot Kahlua    In a shot glass, layer Kahlua
  * 1/3 shot Bailey's  on the bottom, then Bailey's,
  * 1/3 shot Vodka     then Vodka.
 ---------------------------------------------------
root@OpenWrt:/#
Now you can configure OpenWRT. I’ll go through each step I made, but obviously you may deviate from this description.
Set hostname
My first step was to set a hostname on the machine, use vi to edit /etc/config/system to make it read:
config system
        option hostname caramel
If you prefer to cut’n'paste a command line invocation to do this, try:
root@OpenWrt:~# sed -i -e 's/OpenWrt/caramel/' /etc/config/system
Setting a hostname will help when you have multiple OpenWRT boxes running, as the command prompt will show your hostname instead of OpenWRT (after you have restarted the router).
Set IP address
If you want the device to use another IP address than 192.168.1.1 you can modify /etc/config/network, in the LAN configuration section. A quick command to do this:
root@OpenWrt:~# sed -i -e 's/192.168.1.1/192.168.1.15/' /etc/config/network
Replace telnet with SSH
As you do not want to use insecure telnet, you will need to set up ssh. You can type passwd to set a root password, and this will disable telnet. I dislike passwords, even if used over ssh, so I always set up public-key authentication instead. For reference, there is a dropbear public key authentication howto for OpenWRT wiki page.
The command to make your ssh key authorized to login as root on the router is:
root@OpenWrt:/# echo 'PUBLICKEY' > /etc/dropbear/authorized_keys
Replace PUBLICKEY with the content of the ~/.ssh/id*.pub file on your own machine or the output from ssh-add -L if you use the SSH agent.
Disable password based login using:
root@OpenWrt:/# sed -i -e "s/'on'/'off'/" /etc/config/dropbear
Alternatively, edit /etc/config/dropbear to look like:
config dropbear
        option PasswordAuth 'off'
        option Port         '22'
At this point, you can print the ssh host key fingerprint using:
root@OpenWrt:~# dropbearkey -y -f /etc/dropbear/dropbear_rsa_host_key
Public key portion is:
ssh-rsa AAAA... root@OpenWrt
Fingerprint: md5 ...
To use the web interface, you may want to set a root password.
root@OpenWrt:/# passwd
Changing password for root
New password:
Retype password:
Password for root changed by root
root@OpenWrt:/#
If you do not set a root password, you will need to manually disable the telnet server as follows.
root@OpenWrt:~# /etc/init.d/telnet disable
After you have made your changes, try the new configuration by rebooting both devices.
root@OpenWrt:/etc/config# reboot
You should now be able to login as root using SSH. Try it from your machine. The SSH fingerprint should match what was printed by dropbearkey earlier.
jas@mocca:~$ ssh -l root 192.168.1.15
The authenticity of host '192.168.1.15 (192.168.1.15)' can't be established.
RSA key fingerprint is ...
Are you sure you want to continue connecting (yes/no)? yes
Warning: Permanently added '192.168.1.15' (RSA) to the list of known hosts.


BusyBox v1.15.3 (2010-04-06 04:14:37 CEST) built-in shell (ash)
Enter 'help' for a list of built-in commands.

  _______                     ________        __
 |       |.-----.-----.-----.|  |  |  |.----.|  |_
 |   -   ||  _  |  -__|     ||  |  |  ||   _||   _|
 |_______||   __|_____|__|__||________||__|  |____|
          |__| W I R E L E S S   F R E E D O M
 Backfire (10.03, r20728) --------------------------
  * 1/3 shot Kahlua    In a shot glass, layer Kahlua
  * 1/3 shot Bailey's  on the bottom, then Bailey's,
  * 1/3 shot Vodka     then Vodka.
 ---------------------------------------------------
root@caramel:~#
Setup wireless
Wireless is disabled by default, and you will have to modify “/etc/config/wireless” to configure it.
A simple setup that use (insecure) WEP would be:
config wifi-device  wl0
        option type     broadcom
        option channel  5

config wifi-iface
        option device   wl0
        option network  lan
        option mode     ap
        option ssid     YourNetworkName
        option encryption wep
        option key      DEADBEEF
A better setup that still use shared secrets but the more secure PSK2 would be:
config wifi-device  wl0
        option type     broadcom
        option channel  5

config wifi-iface
        option device   wl0
        option network  lan
        option mode     ap
        option ssid     YourNetworkName
        option encryption psk2
        option key      DEADBEEFDEADBEEFDEADBEEFDEADBEEF
Remember, your security is never better than your password.
As you may recall, the point of this exercise was to set up two routers with WDS and PSK2. For discussion, let’s say the MAC address of box 1 is 12:34:56:78:89:ab and the MAC address of box 2 is cd:ef:01:23:45:67. You can use ifconfig on each of the routers to find out the MAC address.
On the first box, my /etc/config/wireless file looks like:
# /etc/config/wireless configuration for device 12:34:56:78:89:ab
config wifi-device  wl0
        option type     broadcom
        option channel  5

config wifi-iface
        option device   wl0
        option network  lan
        option mode     ap
        option ssid     YourNetworkName
        option encryption psk2
        option key      UserNetworkPassword

config wifi-iface
        option device   wl0
        option network  lan
        option mode     wds
        option bssid    cd:ef:01:23:45:67
        option encryption psk2
        option ssid     WDSNetworkName
        option key      InternalWDSPassword
Replace YourNetworkName and WDSNetworkName with something more appropriate. You want to use a different SSID for the WDS than for the normal network.
On the second box, the /etc/config/wireless will look the same except that the BSSID will contain the MAC address of the first box. Here is the file:
# /etc/config/wireless configuration for device cd:ef:01:23:45:67
config wifi-device  wl0
        option type     broadcom
        option channel  5

config wifi-iface
        option device   wl0
        option network  lan
        option mode     ap
        option ssid     YourNetworkName
        option encryption psk2
        option key      UserNetworkPassword

config wifi-iface
        option device   wl0
        option network  lan
        option mode     wds
        option bssid    12:34:56:78:89:ab
        option encryption psk2
        option ssid     WDSNetworkName
        option key      InternalWDSPassword
Additional configuration on slave router
Both routers will by default run a DHCP server. You want to disable it on the "slave" router (i.e., the one not connected to the Internet).
root@skata:~# /etc/init.d/dnsmasq disable
root@skata:~#
If you want to reach the Internet from the slave router itself, you will need to modify the LAN configuration details to add the "gateway" and "dns" parameters. Modify /etc/config/network to make the LAN configuration section look like this:
#### LAN configuration
config interface lan
        option type     bridge
        option ifname   "eth0.0"
        option proto    static
        option ipaddr   192.168.1.20
        option netmask  255.255.255.0
        option gateway  192.168.1.15
        option dns      192.168.1.15
Note that here 192.168.1.20 is the IP address of the slave router, and 192.168.1.15 is the IP address of the route connected to the Internet.
Restart router
After you have made your changes, try the new configuration by rebooting both devices.
root@caramel:/etc/config# reboot
After 30 seconds or so, the devices should have connected via WDS and you should be able to ping the IP addresses of router A from router B and vice verse.
The default configuration is to bridge the wireless networks with the LAN ethernet sockets, so you can connect desktop machines etc and they should be able to reach all devices connected to the wireless network or the ethernet sockets on any of the two WDS connected routers.
Additional software
You can use opkg to install additional tools easily. First run opkg update to update the package list:
root@caramel:~# opkg update
Downloading http://downloads.openwrt.org/backfire/10.03/brcm-2.4/packages/Packages.gz.
Inflating http://downloads.openwrt.org/backfire/10.03/brcm-2.4/packages/Packages.gz.
Updated list of available packages in /var/opkg-lists/packages.
root@caramel:~#
Use opkg list to list all available packages.
Useful tools to install on a typical router includes avahi-daemon, miniupnpd, and openntpd.
The clock will typically be way off unless you set it. Install a NTP client to automate keeping the clock correct. (The package openntpd also works but takes more space.)
root@caramel:~# opkg install luci-app-ntpc
Installing luci-app-ntpc (0.9.0-1) to root...
Downloading http://downloads.openwrt.org/backfire/10.03/brcm-2.4/packages/luci-app-ntpc_0.9.0-1_brcm-2.4.ipk.
Installing ntpclient (2007_365-4) to root...
Downloading http://downloads.openwrt.org/backfire/10.03/brcm-2.4/packages/ntpclient_2007_365-4_brcm-2.4.ipk.
Configuring ntpclient.
Configuring luci-app-ntpc.
root@caramel:~#
Avahi allows DNS based service discovery, which is relevant on both primary and repeater routers. Install and enable as follows:
root@caramel:~# opkg install avahi-daemon
Installing avahi-daemon (0.6.25-1) to root...
Downloading http://downloads.openwrt.org/backfire/10.03/brcm-2.4/packages/avahi-daemon_0.6.25-1_brcm-2.4.ipk.
Installing libavahi (0.6.25-1) to root...
Downloading http://downloads.openwrt.org/backfire/10.03/brcm-2.4/packages/libavahi_0.6.25-1_brcm-2.4.ipk.
Installing libdaemon (0.14-2) to root...
Downloading http://downloads.openwrt.org/backfire/10.03/brcm-2.4/packages/libdaemon_0.14-2_brcm-2.4.ipk.
Installing libpthread (0.9.30.1-42) to root...
Downloading http://downloads.openwrt.org/backfire/10.03/brcm-2.4/packages/libpthread_0.9.30.1-42_brcm-2.4.ipk.
Installing librt (0.9.30.1-42) to root...
Downloading http://downloads.openwrt.org/backfire/10.03/brcm-2.4/packages/librt_0.9.30.1-42_brcm-2.4.ipk.
Installing libgdbm (1.8.3-1) to root...
Downloading http://downloads.openwrt.org/backfire/10.03/brcm-2.4/packages/libgdbm_1.8.3-1_brcm-2.4.ipk.
Installing libexpat (2.0.1-1) to root...
Downloading http://downloads.openwrt.org/backfire/10.03/brcm-2.4/packages/libexpat_2.0.1-1_brcm-2.4.ipk.
Configuring librt.
Configuring libpthread.
Configuring libdaemon.
Configuring libgdbm.
Configuring libavahi.
Configuring libexpat.
Configuring avahi-daemon.
root@caramel:~# /etc/init.d/avahi-daemon enable
root@caramel:~# /etc/init.d/avahi-daemon start
root@caramel:~#
You should now be able to login to your router using ssh -l root caramel.local (replace caramel with the name of your router).
Bittorrent clients, for example, can use UPnP to open up ports in the firewall. For this to work, install a UPnP server on your primary router (it makes no sense to install it on the repeaters):
root@caramel:~# opkg install miniupnpd luci-app-upnp
Installing miniupnpd (1.4-1) to root...
Downloading http://downloads.openwrt.org/backfire/10.03/brcm-2.4/packages/miniupnpd_1.4-1_brcm-2.4.ipk.
Installing luci-app-upnp (0.9.0-1) to root...
Downloading http://downloads.openwrt.org/backfire/10.03/brcm-2.4/packages/luci-app-upnp_0.9.0-1_brcm-2.4.ipk.
Configuring miniupnpd.
Configuring luci-app-upnp.
root@caramel:~# /etc/init.d/miniupnpd enable
root@caramel:~# /etc/init.d/miniupnpd start
root@caramel:~#
The End
This work is licensed under a Creative Commons Attribution-Share Alike 3.0 Unported License.
